Prerequisites
Before you start, ensure you have the following:
1) AWS Account: You need an AWS account to use Elastic Beanstalk and other AWS services. If you don't have an account, you can create one at aws.amazon.com.
2) AWS Elastic Beanstalk Application: Set up an AWS Elastic Beanstalk application. You can create one using the AWS Management Console or the Elastic Beanstalk CLI (
eb).3) RazorOps Account: Sign up for a RazorOps account at razorops.com if you don't have one. Use your github account to login where you will fork the repo.
4) Git Repository: Fork this repository https://github.com/saurabhsy8/yii2-sample
Create AWS Elastic Beanstalk Application
Go to elastic beanstalk console and click on create application:

Under Environment tier select Web server environment, give application name, give environment name here I gave test leave domain black for now


Under platform section select PHP since our demo application is PHP application and select upload your code under application code section and in version label you can enter 1 for now later this will be updated by pipeline and in source code origin select Local file.

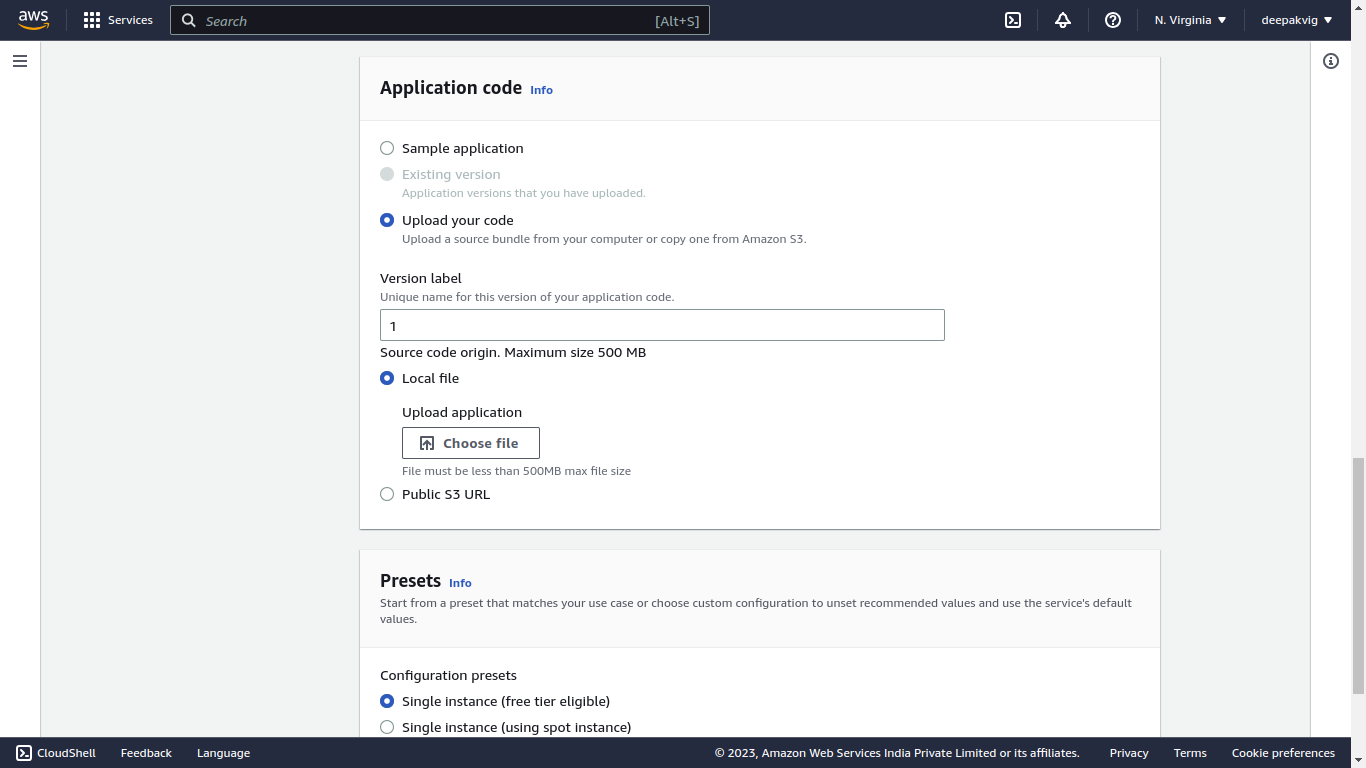
Leave Presets as it is and click on Next
Under Service role select Create and use new service role, we need to create EC2 key pair and EC2 Instance profile.

Create EC2 key pair: Go to EC2 instance console find Key Pairs under Network & Security

Click on Create Key pair

Give the key pair name here eb and leave the default selection as it is and click on Create key pair, this will prompt to download the pem file.

Create EC2 Instance profile:
Go to IAM console and find Roles under Access management and click on Create role.

Select AWS Service and under Use case select EC2 then click next

Search for AWSElasticBeanstalk and select three permissions AWSElasticBeanstalkWebTier, AWSElasticBeanstalkWorkerTier and AWSElasticBeanstalkMulticontainerDocker and click next

Give the role name in my case I have given ec2-eb-instance-profile and click on Create role

Now go back to elastic beanstalk console where we left. We are able to select eb in key pair drop down and ec2-eb-instance-profile in instance profile drop down. Move forward and click on next

Select default VPC and any sub-net (you can select private sub-nets) under Instance settings, I selected two. Leave rest as it is. Click on next

For instance setting I selected General Purpose (SSD) and 10 GB of size and leave rest as it is and click on next

Select Basic Health reporting, leave rest as it is till Platform software, under Platform software select Apache as proxy server and set /public as root document and click on next.

At last review it and click on submit, when you try to open the Domain link it will not work because there is no code running. Code will be uploaded by our pipeline.

Create razorops Pipeline
we should have forked this repo before creating pipeline, next go to razorops dashboard
click on New Pipeline -> Select Github -> search for yii2-sample -> select the repo and click on confirm. At last we will be able to see our pipeline.


Understand .razorops.yaml file
At root level we will find .razorops.yaml let's beak down and try to understand it
version: v2

tasks:
  deploy:
    variables:
    - APP_NAME=php-web-app
    - VERSION=${CI_COMMIT_SHA:0:8}
    - ENV_NAME=test
    - AWS_REGION=us-east-1
    - PLATFORM=PHP
    steps:
    - checkout
    - commands:
      - |
        if [[ $CI_REPO_BRANCH == "prod" ]]; then
                  ENV_NAME=prod

          elif [[ $CI_REPO_BRANCH == "test" ]]; then
                  ENV_NAME=test
          else
              echo "Unsupported release branch: $CI_REPO_BRANCH "
              exit 1
        fi
      - |
        sudo apt -qq update
        # sudo apt-get -qq install php-curl php-mbstring php-zip php-dom
        pip -q install PyYAML==5.3.1
        pip -q install awsebcli --upgrade --user

        eb init $APP_NAME --platform $PLATFORM --region $AWS_REGION --quiet

        # First create a version with git hash (label)
        eb appversion -a $APP_NAME -c -l $VERSION

        # Deploy $VERSION on $ENV_NAME envrionment
        eb deploy $ENV_NAME --version $VERSION

trigger:
  when: branch in ("test", "prod")
1. Version Declaration:
version: v2
- This specifies the version of the Razorops configuration.
2. Tasks:
The tasks section defines a task named deploy. This task is responsible for deploying the PHP web application. It includes several environment variables and a series of steps to be executed during the deployment process.
variables: This section defines environment variables that will be used throughout the task.
APP_NAME: The name of the application (set to "php-web-app").
This is the name of our beanstalk application we created above.
VERSION: The version of the application, derived from the first 8 characters of the CI/CD commit SHA.
ENV_NAME: The environment name, initially set to "test" and later adjusted based on the branch being deployed.
Application can have multiple environment like dev, uat, test, prod etc, we initially create one environment and named it test
AWS_REGION: The AWS region where the Elastic Beanstalk environment will be deployed (set to "us-east-1").
PLATFORM: The platform of the application (set to "PHP").
steps: This section lists the steps to be executed during the deployment process.
checkout: This step checks out the source code from the repository.
commands: This step includes several shell commands.
It checks the branch being deployed and sets the ENV_NAME accordingly to either "prod" or "test."
It updates the package lists on the build environment and installs required dependencies.
It installs Python packages PyYAML and awsebcli for Elastic Beanstalk deployment.
It initializes the Elastic Beanstalk application with eb init.
It creates an application version based on the Git commit SHA and deploys it to the specified environment.
3 Trigger:
trigger:
  when: branch in ("test", "prod")
This specifies the trigger conditions for when the deploy task should run. It triggers the task when changes are pushed to branches named "test" or "prod."
Setup IAM role for pipeline:
To grant the Elastic Beanstalk CLI (Command Line Interface) the necessary permissions to create a version and upload code to an AWS Elastic Beanstalk environment, you will typically need to configure your AWS CLI with appropriate AWS Identity and Access Management (IAM) permissions. This involves creating an IAM user with the necessary permissions and then configuring your environment to use the access keys or role associated with that IAM entity.
Go to AWS IAM console find User under Access management and click on Create user:

Name it pipeline, leave that checkbox empty and click on next

Under the Permissions option, select Attach policies directly' and in the Permissions policies search for elasticbeanstalk. You should then see and select AdministratorAccess-AWSElasticBeanstalk. Click 'Next' to proceed.

Now just click on Create user

Now open the pipeline user and click on Security credentials tab then we will see Access keys section, click on Create access key

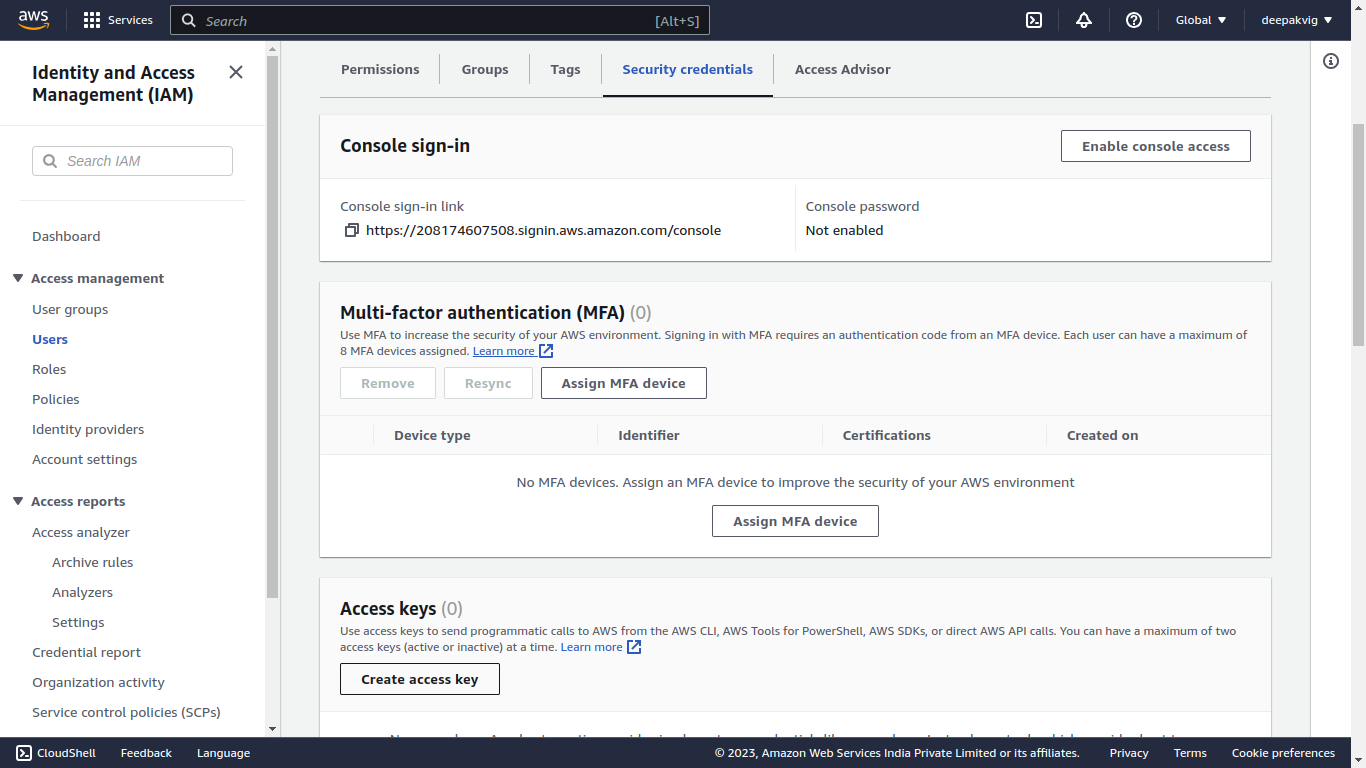
Select Command Line Interface (CLI) and scroll down and check the Confirmation box and click on Next


Give any description you find suitable or you can leave it blank, click on Create access key

Copy the access key and Secret access key and save it in secure place for our pipeline

Now go back to razorops dashboard and open yii2-sample and open Variables tab under which we will add three variables of IAM user we just copy from above.
AWS_ACCESS_KEY_ID is a unique identifier for your AWS account. It is used to authenticate your AWS CLI or SDK requests.
AWS_SECRET_ACCESS_KEY is a secret key that is paired with the AWS_ACCESS_KEY_ID. It is used for cryptographic signing of your requests to AWS services.
AWS_DEFAULT_REGION specifies the default AWS region that your AWS CLI or SDK will use if a region is not explicitly specified in the command or code.


Demo:
For demo we will make some changes to our test branch and will push it to our github repository that will trigger our pipeline and will create a application version and set that version as current deployment.
First create a test branch from main branch to do this first we need to move into the projct folder which is yii2-app then run this command:
git checkout -b test Then edit this file src/Action/HomeAction.php, you should see this as old content on line number 17.

you can edit line 17 to any html content you want like I did it here "This change is from pipeline"
<?php

declare(strict_types=1);

namespace App\Action;

use Psr\Http\Message\ResponseFactoryInterface;
use Psr\Http\Message\ResponseInterface;

final class HomeAction
{
    public function run(ResponseFactoryInterface $responseFactory): ResponseInterface
    {
        $response = $responseFactory->createResponse();

        $response->getBody()->write(
            'This change is from pipeline' . '<br>' . 'My first website with ' . '<strong>' . 'Yii 3.0!' . '</strong>'
        );

        return $response;
    }
}
Now run these command to commit our changes, as soon as we push it we will see a
pipeline run on razorops dashboard:
git add .
git commit -m "updated HomeAction.php"
git push origin test

We will see as soon as it shows green status (deployment done), go to Elastic Beanstalk console and click to the link under Domain:

Now click on link under Domain

See our change is deployed correctly!!
 Now give it a try :)
Was this article helpful?
That’s Great!
Thank you for your feedback
Sorry! We couldn't be helpful
Thank you for your feedback
Feedback sent
We appreciate your effort and will try to fix the article